Seven Tips For Using Swagger And AutoRest Together In ASP.NET Core Services
Swagger is probably the most popular API specification framework, AutoRest is a great library to generate clients out of Swagger definitions for various programming languages. Here are a few tips to get nice and clean results using the two together in ASP.NET Core MVC based web services/apps.
The code of this post and a full example website consuming a service can be found in this GitHub repository
Update: I updated the examples in tip 6) to react to changes in the autorest cli in version 1.x. Also in tip 7), I added a "fix" for the
dotnet publishbug which prevents publishing xml documentation files correctly.
Getting Startedlink
Before getting into the details, here is the basic setup which needs to be in place to get swagger documentation out of your service.
If you want to start a new project:
- Use Visual Studio to create new ASP.NET Core Web API project, or use
dotnet new webapi. - Install the
Swashbuckle.AspNetCoreNuGet package.
For any new or existing project, configure the swagger generator:
- In
Startup.cs, addAddSwaggerGento the DI container
services.AddSwaggerGen(opt =>
{
    opt.SwaggerDoc("doc", new Info() { Title = "DataService" });
});
To get an endpoint within the current project which exposes the swagger definition, add
app.UseSwagger();to theConfiguremethod.The path to
swagger.jsonby default will be/swagger/<name>where<name>is the name we defined inSwaggerDoc(name, ..). In this example, the URL will be/swagger/doc/swagger.json.If you also want the swagger UI being hosted by your service, add
app.UseSwaggerUI, too. In case the UI should be available during development only, use theIHostingEnvironmentto check forIsDevelopmentfor example.
app.UseSwagger();

if (env.IsDevelopment())
{
    app.UseSwaggerUI(c =>
    {
        c.SwaggerEndpoint("/swagger/doc/swagger.json", "DataService API");
    });
}
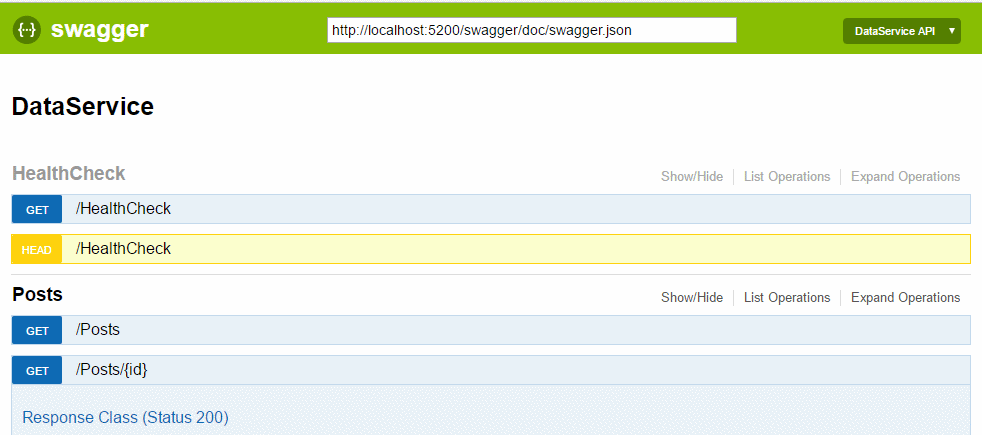
Running the app and navigating to /swagger should open up the UI with any service defined so far.
I'm explicitly not specifying a version here, we could use a version for the API definition and put it in the name of AddSwaggerGen.
But versioning APIs is a different topic and can be solved (without actually doing versioning) in many different ways.
1. Attribute based Routinglink
Use proper attribute routing to create swagger conform APIs.
Swagger needs unique paths across all endpoints of your service/app. In terms of ASP.NET Core MVC controllers, this means, if you have multiple controllers with a parameterless [HttpGet] method for example, the path to the method must be unique.
The most simple way to ensure this is to use the [Route("[Controller]")] route attribute on each controller which would generate a path like /<ControllerName>.
[Route("[controller]")]
public class PostsController : Controller
{
    [HttpGet("")]
    public IActionResult Get()
    {
        ...
    }
This works, as long as the controller names are unique and you actually want to have the name of the controllers define the API.
You can still just put anything you want into the route like [Route("nameingishard")] or [Route("api/[Controller])].
2. Use Http Verb Attributeslink
This is not really a Tip as this is the basic requirement for the swagger generator to be able to examine all the controllers and generate the documentation from it. But again, make sure the paths created are unique enough.
The following will not work as the two methods have exactly the same route and the first one will be called all the time.
[HttpGet("{a}")]
public IActionResult GetA(string a)
{
    return Json(a);
}

[HttpGet("{b}")]
public IActionResult GetB(string b)
{
    return Json(b);
}
In case a controller has multiple methods with the same verb, give the route a unique name, like:
[HttpGet("geta/{a}")]
public IActionResult GetA(string a)
{
    return Json(a);
}

[HttpGet("getb/{b}")]
public IActionResult GetB(string b)
{
    return Json(b);
}
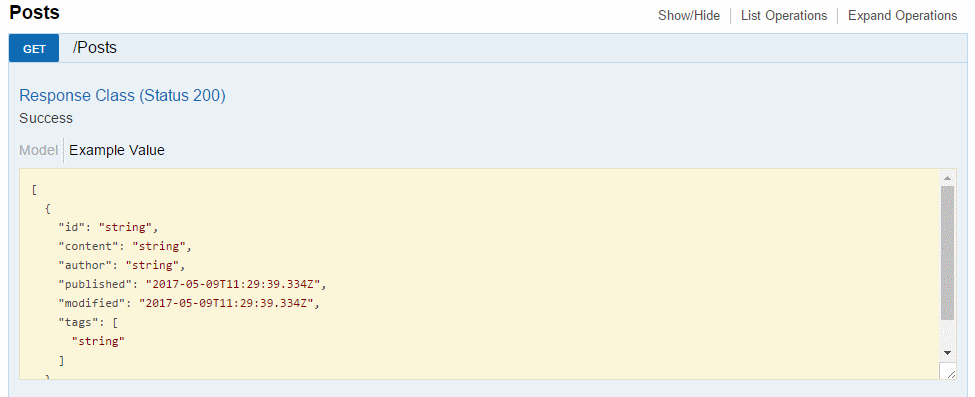
3. Define What The Action Produceslink
Make use of the [Produces] attribute on each action method. The swagger generator can generate model definitions which then get picked up by the AutoRest tooling, too.
If applicable, also declare the content type the method returns. In the example below, we always return JSON only:
[HttpGet("")]
[Produces("application/json", Type = typeof(List<BlogPostModel>))]
public IActionResult GetAll()
{
    return Json(_cache);
}
AutoRest will generate models for the client from the swagger definition and the model will also show up in the swagger docs:
4. Define Operation Idslink
While using AutoRest or other code generators, you might see really strange method names being generated out of the swagger definition.
For example, if the following method exists in a controller
[Route("[controller]")]
public class PostsController : Controller
{
    [HttpGet("")]
    [Produces("application/json", Type = typeof(List<PostModel>))]
    public IActionResult GetAll()
    {
        return Json(_cache);
    }
    ...
AutoRest generates an extension method called IList<PostModel> PostsGet. The swagger generation uses the controller's name and the http verb in this case.
It gets even worse if we have the following defined:
[HttpGet("geta/{a}")]
public IActionResult GetA(string a)
{
    return Json(a);
}
The generated method name will be PostsGetaByAGet. That's not really how we want the generated client to look like right?
But who is to blame here, actually, it is not AutoRest, AutoRest just uses whatever operation id is defined in the swagger.json:
...
"/Posts/geta/{a}": {
    "get": {
        "operationId": "PostsGetaByAGet",
        "consumes": [],
        "produces": [],
        "parameters": [{
                "name": "a",
                "in": "path",
                "required": true,
                "type": "string"
            }
        ]
    }
},
To tweak the value of OperationId, we can use the Swashbuckle.AspNetCore.SwaggerGen.SwaggerOperationAttribute.
[HttpGet("geta/{a}")]
[Produces("application/json", Type = typeof(string))]
[SwaggerOperation(operationId: "getA")]
public IActionResult GetA(string a)
{
    return Json(a);
}
The generated swagger.json now looks a little bit different:
"/Posts/geta/{a}": {
    "get": {
        "operationId": "getA",
        "consumes": [],
        "produces": ["application/json"],
        "parameters": [{
                "name": "a",
                "in": "path",
                "required": true,
                "type": "string"
            }
        ]
    }
},
And the generated client's method is now called string GetA(string a).
Important: Operation ids must be unique across all controllers within one service/app. There cannot be two methods with operation id
GetAin two different controllers for example. Make sure to name the operation id to be unique across all controllers' actions! That's why the swagger generator creates so verbose names per default.
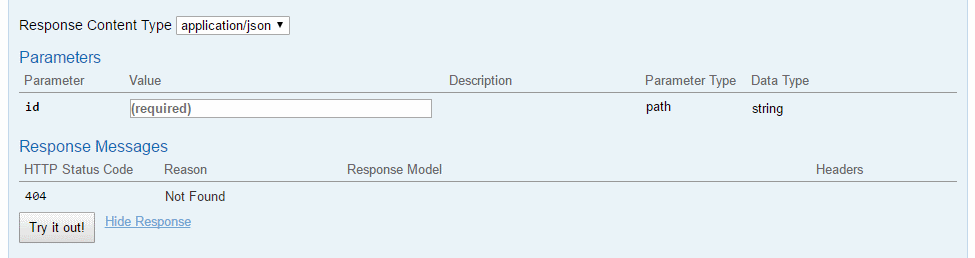
5. Response Code Handlinglink
A swagger definition can contain a list of valid response-codes a service method might return. A success response with code 200 will be assumed if nothing is explicitly defined.
Using the ProducesResponseTypeAttribute, we can actually define more than just response code 200 OK and also control the behavior of generated clients.
Let's have a look at a method which retrieves a blog post by id:
[HttpGet("{id}")]
[Produces("application/json", Type = typeof(PostModel))]
[SwaggerOperation(operationId: "getBlogPostById")]
public IActionResult GetPostById(string id)
{
    var post = _cache.Value.FirstOrDefault(p => p.Id.Equals(id, StringComparison.OrdinalIgnoreCase));
    if (post == null)
    {
        return NotFound();
    }

    return Json(post);
}
Returning 404 if the element requested doesn't exist is usually a good practice.
On the client side, it now depends on how the client library handles that 404 response.
In case of AutoRest, the generated client will now throw a HttpOperationException for invalid status code '404'.
But that is not really friendly for consumers, you'd have to try/catch the call, and inspect the exception details to figure out what happened. A much more elegant behavior would be to return null in this case.
The way to get AutoRest to return null in case of a 404 response is to use ProducesResponseTypeAttribute on the service's action:
[HttpGet("{id}")]
[Produces("application/json", Type = typeof(PostModel))]
[SwaggerOperation(operationId: "getBlogPostById")]
[ProducesResponseType((int)HttpStatusCode.NotFound)]
public IActionResult GetPostById(string id)
...
The generated GetBlogPostById method now returns null in case the post for the id doesn't exist, instead of throwing an exception. The swagger documentation also highlights the valid response-codes:
In some cases, it might be good to also define a more explicit response type for successful calls.
To do so, add a ProducesResponseTypeAttribute for status code 200 OK. The attribute can also take the return type as parameter, which makes the Type property of Produces redundant.
This is valuable, if you want to return different things from one and the same method, for example, the following returns two different types depending on the returned status code:
[HttpGet("{id}")]
[Produces("application/json")]
[SwaggerOperation(operationId: "getBlogPostById")]
[ProducesResponseType((int)HttpStatusCode.NotFound)]
[ProducesResponseType(typeof(PostModel), (int)HttpStatusCode.OK)]
[ProducesResponseType(typeof(PostModelExtended), 210)]
public IActionResult GetPostById(string id)
...
The AutoRest generated client will actually respect this and deserialize the correct model depending on the status code, here is some of the auto generated code:
...
if ((int)_statusCode == 200)
{
    _responseContent = await _httpResponse.Content.ReadAsStringAsync().ConfigureAwait(false);
    try
    {
        _result.Body = SafeJsonConvert.DeserializeObject<PostModel>(_responseContent, DeserializationSettings);
    }
    ...
}
if ((int)_statusCode == 210)
{
    _responseContent = await _httpResponse.Content.ReadAsStringAsync().ConfigureAwait(false);
    try
    {
        _result.Body = SafeJsonConvert.DeserializeObject<PostModelExtended>(_responseContent, DeserializationSettings);
    }
    ...
}
That being said, it is questionable if this behavior makes an API really easy to use. Would probably much easier to create another action which returns the secondary model...
Also, be careful what response codes you declare as acceptable, as you might want the client to throw an exception in some cases. Security is a good example, adding [ProducesResponseType((int)HttpStatusCode.Unauthorized)] would also result in the client returning null when calling a method without proper authentication...
6. Setup AutoRest as NPM Scriptlink
The latest version of AutoRest comes as an NPM package and can therefor easily be used from almost everywhere via command line.
The AutoRest cli in version 1.x now has some build-in version management. To install, update or reset, use the following commands:
# Install latest autorest package
npm install -g autorest

# Update the generator plugins to the latest stable version
autorest --reset

# install the latest nightly autorest generators
autorest --latest --prerelease

# revert back to the latest stable release of autorest generators:
autorest --reset
For more information of how to install/use AutoRest, see the docs on GitHub.
The cli commands changed a little bit in the latest updates, see the cli/command docs for details.
To add some comfort to the tooling, you can simply create an NPM script alias which calls AutoRest with all the parameters needed.
{
  "scripts": {
    "generate": "autorest --namespace=Clients.DataService --input-file=http://localhost:5200/swagger/doc/swagger.json --output-folder=Clients.DataService --csharp"
  }
}
The --namespace parameter defines the namespace of the generated client and --output-folder defines the directory the code gets generated into.
Make sure to have at least one language specified, like --csharp otherwise, AutoRest will not generate anything (no defaults).
If your service is secured and needs an OAuth token for example, also add --add-credentials to the call. This will generate slightly different constructors for the client accepting credentials.
If you install Mads Kristensen's extension, the command now also shows up in Visual Studio's "Task Runner Explorer":

7. Add (Triple Slash) XML Documentation To Swaggerlink
Swashbuckle supports to add xml documentation comments in your source code to the generated swagger output.
If enabled, the <summary> will map to the operation's summary, <remarks> will map to the operation's description (shown as "Implementation Notes" in the UI).
And to add description for each return type, you can use the custom <response> tag.
Example xml comments:
/// <summary>
/// Gets a blog post by identifier.
/// </summary>
/// <param name="id">The identifier.</param>
/// <returns>The blog post.</returns>
/// <remarks>
/// As <c>404</c> is a valid response code, clients should return <c>null</c> for those responses instead of throwing an exception.
/// </remarks>
/// <response code="200">The blog post for the <paramref name="id"/>.</response>
/// <response code="404">No post found for the <paramref name="id"/>.</response>
Result:

To have Swashbuckle pickup the comments, it has to read the generated xml file, which is a little bit unfortunate as it needs the full path to the xml file, which is usually found in the bin folder with the same name as the project/module, but must be configured depending on the project's configuration.
See also the Swashbuckle documentation for more details.
To enable xml file generation for project(s), manually add the GenerateDocumentationFile property to the main property group. Do not use the Visual Studio UI and check the checkbox for xml files, this would add property groups with conditions and absolute file paths to the .csproj files... Just having GenerateDocumentationFile property is much cleaner.
Make sure to add it to a property group which does not have any condition for a certain build configuration or target!
<GenerateDocumentationFile>true</GenerateDocumentationFile>
Then, point the swagger generator to the file. The following code uses the module's name and the AppContext.BaseDirectory. If you configured your project to output the xml file to a different location, you also have to adjust this part of course.
services.AddSwaggerGen(opt =>
{
    opt.SwaggerDoc("doc", new Info() { Title = "DataService" });

    var fileName = this.GetType().GetTypeInfo().Module.Name.Replace(".dll", ".xml").Replace(".exe", ".xml");
    opt.IncludeXmlComments(Path.Combine(AppContext.BaseDirectory, fileName));
});
Keep in mind that depending on the build target, the output of the service might be a dll or exe.
Note that you have to call IncludeXmlComments for every project or Nuget you want to include xml comments in swagger.
Dotnet Publish Issueslink
There is currently a bug in dotnet publish which might prevent the .xml files getting copied over to the published artifact (see issue 795).
The workaround for now is to manually add a target to the service's .csproj file which copies the files during publish:
 <Target Name="CopyDocumentationFile"
         AfterTargets="ComputeFilesToPublish">
   <ItemGroup>
     <ResolvedFileToPublish Include="@(FinalDocFile)"
                            RelativePath="@(FinalDocFile->'%(Filename)%(Extension)')" />
   </ItemGroup>
 </Target>
The code of this post and a full example website consuming a service can be found in this GitHub repository. Did I miss something important or do you have other tips? Let me know what you think in the comments below